
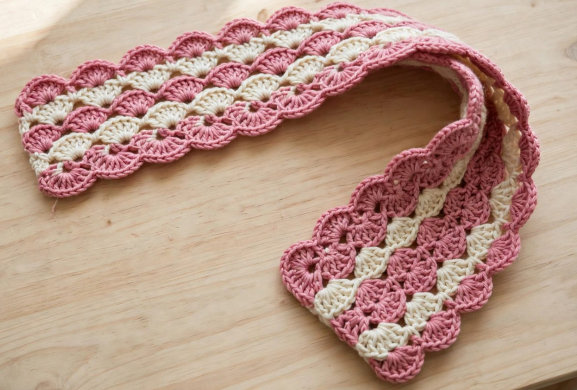
| Finished size | About 8 in (20 cm) wide × 60 in (152 cm) long, not including fringe |
| Difficulty | Easy — only chains, single crochet and double crochet |
| Yarn | Worsted / aran weight yarn: rose pink approx. 250 g (500 m) and cream approx. 150 g (300 m) |
| Hook | 5.0 mm crochet hook |
| Gauge | 1 shell + 1 sc (6 sts) = 1.5 in wide; Rows 2–3 = 0.8 in tall. Gauge is not critical for a scarf. |
| Time | About 6–8 hours, a relaxing weekend project |
This is an original pattern guide written for this scarf. Your finished size may vary a little with your yarn, hook and tension — that is completely normal for a scarf.
Materials:
You will need:
• Rose pink worsted / aran yarn — approx. 250 g (about 500 m / 550 yd). • Cream worsted / aran yarn — approx. 150 g (about 300 m / 330 yd).
• 5.0 mm crochet hook.
• Yarn / tapestry needle for weaving in ends and attaching fringe.
• Scissors and a tape measure.
• Stitch markers (optional) — handy for marking the first stitch of a row.
Abbreviations (US terms)
| ch | chain |
| sl st | slip stitch |
| sc | single crochet |
| dc | double crochet |
| st / sts | stitch / stitches |
| sk | skip |
| rep | repeat |
| RS | right side of the work |
| shell | 5 dc worked into the same stitch |
| half shell | 3 dc worked into the same stitch (used at the scarf edges) |
Notes before you start
• The scarf is worked widthways: the foundation chain is the width (about 8 in) and the rows build up the length (about 60 in).
• The turning chain at the start of a row counts as a stitch where stated.
• Change colour at the end of a row: finish the last stitch of the old colour with the new colour, then turn.
• Count your shells after Row 1 — you should have 5 full shells and 6 sc (31 sts). If the count is off, it is easiest to fix it now.
The Pattern
Stripe sequence
Work 4 rows in rose pink, then 2 rows in cream, and repeat this 6-row stripe all the way along the scarf. End with 4 rows of rose pink so both ends match. Carry the unused colour loosely up the side if you prefer, or fasten off and rejoin at each change — the border will cover the edge.
Foundation
With rose pink, chain 32. (This gives 5 shells across. For a wider scarf, add chains in multiples of 6; for a narrower one, take chains away in multiples of 6.)
Row 1 (RS) — rose pink
Sc in 2nd ch from hook, *sk 2 ch, 5 dc in next ch, sk 2 ch, sc in next ch; rep from * to end. Turn. (5 shells, 6 sc = 31 sts)
Row 2 — rose pink
Ch 3 (counts as dc), 2 dc in first sc (half shell made), *sc in centre dc (3rd dc) of next shell, 5 dc in next sc; rep from * across, ending with sc in centre dc of last shell, 3 dc in last sc. Turn. (5 shells, 2 half shells, 6 sc = 37 sts)
Row 3 — rose pink
Ch 1, sc in first st, *5 dc in next sc, sc in centre dc of next shell; rep from * across, ending with sc in top of turning ch. Turn. (5 shells, 6 sc = 31 sts)
Keep going
Repeat Rows 2–3, following the stripe sequence, until the scarf measures about 58 in (147 cm) from the foundation edge — roughly 140 rows. Measure the length rather than counting rows, and always end with a Row 3 so the last row matches the first. Fasten off.
Border
The border tidies the long edges and frames the shells. Join cream with a sl st in any corner.
Round 1: Ch 1, work sc evenly all the way around the scarf: 1 sc in each st along the two short ends, 1 sc in the end of each row along the two long sides, and 3 sc in each corner. Join with a sl st to the first sc.
Round 2 (scalloped short ends): Along each short end only, work *sk 1 st, 5 dc in next st, sk 1 st, sl st in next st; rep from * across the end. Along the long sides, work 1 sc in each st. Join, fasten off and weave in all ends.
Fringe (optional, but lovely)
Cut 48 strands of rose pink yarn, each 12 in (30 cm) long. For each tassel, take 3 strands together, fold in half, pull the loop through a stitch on a short end with your hook, then pull the loose ends through the loop and tighten. Make 8 tassels on each short end, spacing them evenly. Trim the ends straight. For a two-tone fringe, use 2 rose pink strands + 1 cream strand per tassel.
Finishing & blocking
Weave in every end with the yarn needle. Lay the scarf flat, gently pat the shells into shape and pin the edges straight if needed. Lightly steam it, or mist it with water and leave it to dry flat. Do not pull the shells out of shape — blocking should relax the stitches, not stretch them. The scarf will drape more softly after its first wash.
Care
Hand wash in cool water with a mild detergent, gently squeeze (do not wring), roll in a towel to remove water, and dry flat. If your yarn label says machine washable, use a gentle cold cycle and dry flat. Keep away from Velcro and rough surfaces so the shells do not snag.
Troubleshooting
• Edges waving or curling: you may be adding or losing a stitch at the row ends. Count the shells after every few rows — there should always be 5 full shells (plus the 2 half shells on Row 2). Mark the first stitch of the row with a stitch marker.
• Scarf getting wider or narrower: check that the turning chain is counted where the pattern says so (Row 2 ch 3 counts as a dc; Row 3 ch 1 does not).
• Shells look uneven: keep your tension relaxed on the 5 dc of each shell and pull each one to the same height. The shells even out a lot after blocking.
• Stripes not lining up: always change colour at the end of a row, never in the middle, and carry the yarn up the same side each time.
• Foundation edge too tight: chain with a hook one size larger (5.5 mm), then switch back to 5.0 mm for Row 1.