
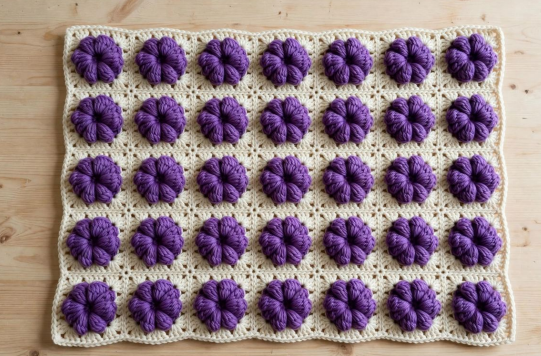
A textured home-decor panel with raised purple puff flowers on a soft cream background. This is an original guide written for this pattern; it is not copied from another designer. Finished size depends on your yarn, hook and tension, so check your gauge before you start.
At a glance
• Finished size: about 16 in wide x 18 in long (about 41 x 46 cm), excluding the border. • Difficulty: Easy — you need chain, single crochet, double crochet and puff stitch. • Hook: 5.0 mm.
• Yarn: worsted weight (medium, weight 4) acrylic or cotton blend.
• Gauge: 12 double crochet stitches = 4 in (10 cm); 8 double crochet rows = 4 in (10 cm). If your panel is wider, try a smaller hook; if it is narrower, try a larger hook.
Materials:
• Cream yarn: about 150 g (about 300 m / 328 yd) — background, plain rows and border.
• Purple yarn: about 180 g (about 360 m / 394 yd) — puff flowers.
• Hook: 5.0 mm; a second, smaller hook is handy for weaving in ends.
• Notions: scissors, yarn needle, stitch markers, measuring tape.
US terms and abbreviations
• ch = chain sc = single crochet dc = double crochet sl st = slip stitch
• st(s) = stitch(es) rep = repeat RS = right side WS = wrong side
• Puff st: [yarn over, insert hook into stitch, yarn over, pull up a loop to about 1/2 in] 4 times — 9 loops on hook — yarn over and pull through all 9 loops, ch 1 to close. The puff counts as 1 stitch. Work the next row into the top of the puff, not into its closing chain.
How the panel is built
Work in rows from the bottom up. Every row has 49 stitches. The background is always cream; only the puff stitches are purple. Change to purple just before a puff, work the puff, then change back to cream for the next double crochet. Carry the unused colour loosely along the wrong side, or cut it and weave in the ends if you prefer a neater back. Flower Row A has 6 puff flowers; Flower Row B is staggered and has 5. Together the six flower rows give 33 puff flowers.
Pattern — foundation and plain rows
Foundation: With cream, ch 50.
Row 1 (RS): Sc in 2nd ch from hook and in each ch across. (49 sc)
Row 2: Ch 3 (counts as first dc), dc in each st across. (49 dc)
Flower Row A — 6 puff flowers
Work in cream except for the puffs, which are purple. Row 3: Ch 3 (counts as dc), dc in next 3 sts, *puff st in next st, dc in next 7 sts; repeat from * 5 times, puff st in next st, dc in last 4 sts. Count: 4 dc + 5 x (1 puff + 7 dc) + 1 puff + 4 dc = 49 sts. (6 puffs)
Flower Row B — staggered, 5 puff flowers:
Row: Ch 3 (counts as dc), dc in next 7 sts, *puff st in next st, dc in next 7 sts; repeat from * 4 times, puff st in next st, dc in last 8 sts. Count: 8 dc + 4 x (1 puff + 7 dc) + 1 puff + 8 dc = 49 sts. (5 puffs)
Full row sequence:
• Rows 1–2: Base rows above — Row 1 sc, Row 2 dc. (49 sts each)
• Row 3: Flower Row A. (49 sts, 6 puffs)
• Rows 4–8: Dc in each st across, cream. (49 dc each row)
• Row 9: Flower Row B. (49 sts, 5 puffs)
• Rows 10–14: Dc in each st across, cream. (49 dc each row)
• Row 15: Flower Row A. (49 sts, 6 puffs)
• Rows 16–20: Dc in each st across, cream. (49 dc each row)
• Row 21: Flower Row B. (49 sts, 5 puffs)
• Rows 22–26: Dc in each st across, cream. (49 dc each row)
• Row 27: Flower Row A. (49 sts, 6 puffs)
• Rows 28–32: Dc in each st across, cream. (49 dc each row)
• Row 33: Flower Row B. (49 sts, 5 puffs)
• Rows 34–36: Dc in each st across, cream. (49 dc each row)
• Row 37: Sc in each st across, cream. (49 sc) Do not fasten off — continue to the border.
Check as you go: after every flower row, count 49 stitches and count the puffs (6 on Row A, 5 on Row B). If a row is short, you have usually missed the top of a puff or worked into its closing chain — that chain is not a stitch.
Border:
Detail: a raised purple puff flower with the neat cream border.
With cream and the right side facing, work Round 1: sc evenly around all four sides — one sc in each stitch along the top and bottom, one sc in the end of each row along the sides — placing 3 sc in each corner stitch. Join with a sl st to the first sc.
Round 2: Ch 1, sc in each sc around, placing 3 sc in the centre sc of each corner group. Join with a sl st and fasten off.
Finishing and blocking
• Weave in all ends on the wrong side with a yarn needle, following the colour of each section so ends do not show through the cream.
• Push each puff gently forward from the wrong side so the flowers sit raised on the right side.
• Block lightly: lay flat, pin to about 16 x 18 in, spray or steam lightly without pressing the puffs flat, and leave to dry flat. Do not iron the puff flowers directly.
• Use it as a wall panel, table runner centre, cushion front, or the front of a tote — add a backing fabric if it will get heavy use.
Care
Hand wash cold with mild detergent, press out water in a towel, and dry flat. Do not bleach, tumble dry on high heat, or hang when wet, as hanging can stretch the panel.
Troubleshooting
• Puffs look flat: pull each loop up to a full 1/2 in and keep the four repeats even; a tight puff will not stand out.
• Edges slant: count the first and last stitch of every row — the turning ch 3 counts as a dc, so do not add an extra dc in the same stitch.
• Row has 50 stitches: you probably worked into a puff closing chain as well as the puff top. Undo to the puff and redo that section.
• Colour shows through the cream: carry purple loosely and only for short stretches, or cut it at each flower and weave the ends in.
• Panel curls: the two border rounds and light blocking usually settle it; if it still curls, add a third border round in sc.