
| Finished size | Approx. 30 in (76 cm) wide x 36 in (91 cm) long — 5 squares across x 6 squares down, each square about 6 in |
| Difficulty | Easy — only chain, slip stitch, double crochet and treble crochet |
| Hook | 4.5 mm |
| Yarn | DK / light worsted cotton or acrylic — blush pink approx. 300 g (600 m), cream approx. 250 g (500 m) |
| Time | Approx. 10–12 hours |
This is an original pattern guide written from the classic granny square. Your finished size may vary a little with your yarn, hook and tension — that is normal. Make one square first and measure it: if it is smaller than 6 in, go up a hook size; if it is larger, go down one.
Materials:
You will need:
• Blush pink yarn — DK / light worsted weight, approx. 300 g (600 m). Soft cotton or baby acrylic is best for a blanket.
• Cream yarn — same weight as the pink, approx. 250 g (500 m).
• Crochet hook — 4.5 mm.
• Yarn needle — for weaving in ends and sewing on the hearts.
• Scissors and a tape measure.
• Stitch markers (optional) — handy for marking the corners while you learn the square.
Gauge
One finished granny square = about 6 in (15 cm) across, using a 4.5 mm hook. Gauge is not critical for a blanket — if your squares come out a little bigger or smaller, the blanket will simply be a little bigger or smaller. For the stated 30 x 36 in size, adjust your hook size until one square measures 6 in.
Abbreviations (US terms)
| ch | chain | dc | double crochet |
| tr | treble crochet | sl st | slip stitch |
| st(s) | stitch(es) | sp | space |
| rep | repeat | RS | right side |
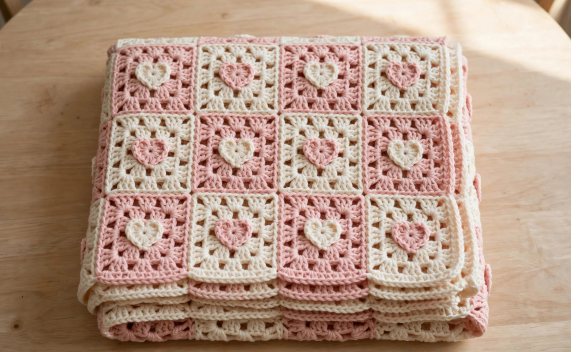
How the blanket is built: 30 granny squares, 5 across and 6 down, joined in a checkerboard — 15 cream squares with blush pink hearts and 15 blush pink squares with cream hearts. Each square is worked in the round for 5 rounds, then the little heart is sewn to the centre. Each round of the
square adds 12 double crochets, so the stitch counts are easy to check: 12, 24, 36, 48, 60.
The Granny Square (make 30)
Work each square in the round on the right side. Begin every square with a magic ring, or chain 4 and join with a slip stitch to form a ring if you prefer. The ch 3 at the start of a round counts as the first dc of that round. Make 15 squares in cream and 15 in blush pink.
Round 1
Ch 3 (counts as dc), 2 dc into the ring, ch 2, *3 dc into the ring, ch 2; rep from * 2 more times. Join with a sl st to the top of the ch 3. (12 dc, 4 ch-2 corner spaces)
Round 2
Sl st across to the next ch-2 corner space. Ch 3, (2 dc, ch 2, 3 dc) in the same corner space, ch 1, *(3 dc, ch 2, 3 dc) in the next corner space, ch 1; rep from * 2 more times. Join with a sl st to the top of the ch 3. (24 dc, 4 corners, 4 ch-1 side spaces)
Round 3
Sl st across to the next corner space. Ch 3, (2 dc, ch 2, 3 dc) in the same corner space, ch 1, 3 dc in the next ch-1 side space, ch 1, *(3 dc, ch 2, 3 dc) in the next corner space, ch 1, 3 dc in the next ch-1 side space, ch 1; rep from * 2 more times. Join with a sl st to the top of the ch 3. (36 dc)
Round 4
Sl st across to the next corner space. Ch 3, (2 dc, ch 2, 3 dc) in the same corner space, ch 1, 3 dc in each of the next 2 ch-1 side spaces with ch 1 between them, ch 1, *(3 dc, ch 2, 3 dc) in the next corner space, ch 1, 3 dc in each of the next 2 ch-1 side spaces, ch 1 between them, ch 1; rep from * 2 more times. Join with a sl st to the top of the ch 3. (48 dc)
Round 5
Sl st across to the next corner space. Ch 3, (2 dc, ch 2, 3 dc) in the same corner space, ch 1, 3 dc in each of the next 3 ch-1 side spaces with ch 1 between them, ch 1, *(3 dc, ch 2, 3 dc) in the next corner space, ch 1, 3 dc in each of the next 3 ch-1 side spaces, ch 1 between them, ch 1; rep from * 2 more times. Join with a sl st to the top of the ch 3. Fasten off and weave in the ends. (60 dc) —
each side now has 3 groups of 3 dc between the corners.
Check your square: it should be about 6 in across and lie flat. If the corners curl up, your tension is tight — go up half a hook size. If the edges ruffle, your tension is loose — go down half a hook size. Block the first square and measure it before making the other 29
The Little Heart (make 30)
Each heart is worked in one tiny round, in the opposite colour to its square: blush pink hearts for the cream squares, cream hearts for the blush pink squares. Leave a long tail (about 12 in) for sewing.
Into a magic ring, work: ch 3, 3 tr, 3 dc, ch 1, 1 tr, ch 1, 3 dc, 3 tr, ch 3, sl st into the ring. Pull the ring tight, fasten off, leaving a long tail. The two bumps at the top and the point at the bottom make the heart shape — gently shape it with your fingers.
Sewing on the hearts
Lay a square flat, right side up. Centre the heart over the middle of the square and pin it in place. Using the yarn needle and the heart’s tail, sew around the heart with small whip stitches, catching the back of the heart and the top of the square stitches. Keep the stitches close to the heart’s edge so they barely show. Fasten off on the back of the square and weave the tail in. Repeat for all 30 squares.
Joining the squares
Lay out the squares in 6 rows of 5, alternating pink and cream like a checkerboard, hearts facing up. Join with a whip stitch in cream yarn, holding two squares right sides together and sewing through the back loops only — this leaves a neat, almost invisible seam on the front. First join each row across (4 seams per row), then join the rows to each other (5 seams). Take your time laying the squares out first: a checkerboard mistake is much easier to fix before sewing!
Joining layout (P = pink square, C = cream square):
| Row 1 | C P C P C |
| Row 2 | P C P C P |
| Row 3 | C P C P C |
| Row 4 | P C P C P |
| Row 5 | C P C P C |
| Row 6 | P C P C P |
Working the Blanket & Border
A good rhythm is one square a day, or a small batch at a time: make all the squares first, then sew on all the hearts, then join everything. When the 30 squares are joined, the blanket should measure about 30 in wide x 36 in long before the border.
Border
The border is worked in cream, around the whole blanket, on the right side. Join cream with a slip stitch at any corner.
Border Round 1: Ch 1, sc in each st around the blanket, working 3 sc in each corner st. Along each edge, work 1 sc into each dc and 1 sc into each ch-1 space — about 5 squares x 12 sts = 60 sc per short edge and 6 squares x 12 sts = 72 sc per long edge, plus 3 sc at each corner. Join with a sl st to the first sc.
Border Round 2 (scalloped edge): Ch 1, *sc in next st, sk 1 st, 5 dc in next st, sk 1 st; rep from * around the whole blanket. At the corners, work the 5-dc shell into the middle sc of the 3-sc corner group so the scallops turn the corner neatly. Join with a sl st to the first sc, fasten off and weave in all ends.
Tip: if the scallops pull the edge in, work the shells with a slightly looser tension or add one extra chain between shells. If the edge ripples, you have too many shells — skip 2 stitches instead of 1 before each shell on the next round.
Finishing, Care & Troubleshooting
Finishing and blocking
Weave in every end with the yarn needle, following the stitch path for about 2 in so the ends cannot work loose. Then block the blanket: lay it flat on a towel, pin the edges straight and pin each corner square, mist lightly with water (or steam gently — do not press the iron onto acrylic), and leave it to dry completely. Blocking is what makes the squares sit flat and the blanket drape nicely.
Care
• Machine wash cold on a gentle cycle, or hand wash in cool water — best for a baby blanket. • Dry flat — do not hang, or the squares will stretch out of shape.
• Do not bleach. If a heart picks up a stain, soak briefly in cool water with a little mild detergent. • Check the sewn-on hearts from time to time, and re-stitch any loose edge before washing.
Troubleshooting
• Square curling up like a bowl? You are working too tightly, or you missed a corner increase. Every round must have 4 corners of (3 dc, ch 2, 3 dc). Count your stitches: each round adds 12 dc.
• Square ruffling like a frill? You have too many stitches — most often an extra 3-dc group in a side space. Each side should have 1 group on Round 3, 2 on Round 4 and 3 on Round 5. • Heart looks lopsided? The two top bumps come from the 3 tr on each side of the round — keep the middle tr (after the ch 1) centred at the bottom point. Shape it with your fingers before sewing it on.
• Seams showing on the front? Make sure you sew through the back loops only, with the squares right sides together. A seam through both loops shows as a ridge on the front. • Blanket wider at one end? Some squares may be slightly different sizes. Block each square to 6 in before joining, and pin them out evenly when you block the finished blanket.