
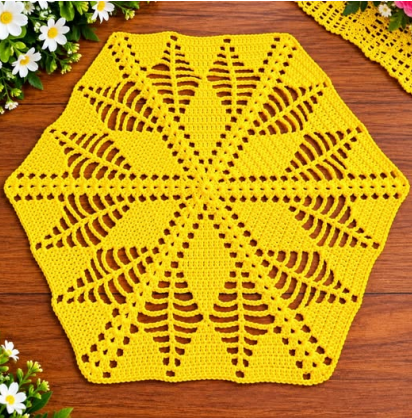
Intermediate | Approx. 15 in (38 cm) across after blocking | US terms
What you will make?
A bright yellow, six-sided (hexagonal) lace doily, like the photo on the cover. It starts as a small solid star in the centre, then grows into six pointed leaf sections with long openwork slots, and finishes with a neat scalloped edge. It works beautifully as a table centrepiece, a placemat, or under a vase or lamp.
Important note: This pattern was written from the photo as a guide, so that you can make a doily that looks like it. It is not the original designer’s pattern. Your finished size will depend on your yarn, hook and tension – that is normal. Check your work after Round 4 (see ‘Check your work’ below) and change hook size if your piece is curling or cupping.
Finished size: approx. 15 in (38 cm) from point to point after blocking, using DK cotton yarn and a 4.0 mm hook. Use a bigger hook or thicker yarn for a larger doily, or a smaller hook or finer yarn for a smaller one.
Time: approx. 6-8 hours in total, best spread over a few sittings. Lace looks slow, but once the leaf repeat clicks, the rounds go quickly.
Difficulty: Intermediate. You should already know chain, slip stitch, single crochet and double crochet. The lace sections are just those same stitches with chain spaces – nothing new.
Materials – everything you need:
Yarn: approx. 200 g (about 600 m) of DK-weight cotton yarn in bright yellow. Cotton is best for a doily because it blocks crisply and holds the lace shape. Acrylic DK yarn also works, but it will not block as sharply.
Hook: 4.0 mm (US G-6). If you crochet very tightly, try 4.5 mm; if very loosely, try 3.5 mm.
Other: scissors, tapestry needle for weaving in ends, 6 stitch markers (one for each corner – this is the secret to keeping a hexagon even), a measuring tape, a blocking mat or clean towel, rust-proof pins, and a spray bottle of water.
Abbreviations (US terms):
ch = chain | sl st = slip stitch | sc = single crochet | dc = double crochet | tr = treble crochet sp = space | st(s) = stitch(es) | rep = repeat | … = repeat the instructions between the stars Corner = the ch-2 space at each of the 6 points of the hexagon. Always place a stitch marker in each corner space when you make it, and move the marker up each round. Joining a round: unless stated otherwise, join with a sl st to the top of the first stitch of the round (the ch-3 at the start counts as the first dc). Reading the pattern: Work in rounds, not rows. Do not turn your work unless the pattern says so. The right side (the pretty side) always faces you.
Before you start – read this first :
1. Count your corners. A hexagon has 6 corners. After every round, count: you must have 6 corner spaces. If you have 5 or 7, you missed or added a corner – go back and fix that round, do not carry the mistake forward.
2. Keep your tension relaxed. Lace needs loose, even stitches. If your chain spaces feel tight, your lace will pull in. Breathe, and let the hook do the work.
3. Blocking is not optional. Lace only shows its pattern after blocking. A finished doily that looks crumpled before blocking is completely normal.
4. Use the markers. Put a marker in every corner ch-2 space. It saves you counting every stitch on every round.
Part A – The solid centre (Rounds 1-4):
This part makes the small solid star in the middle of the photo. Work loosely and count as you go.
Round 1 Make a magic ring. Ch 3 (counts as your first dc). Work 11 dc into the ring. Pull the ring closed tightly. Sl st to the top of the ch-3 to join. (12 dc) What you should see: a tiny flat circle, about the size of a coin.
Round 2 Ch 3, dc in the same st. Work 2 dc in every st around. Sl st to join. (24 dc) What you should see: a flat circle, still solid, about twice the size of Round 1.
Round 3 – the 6 corners appear Dc in the next 3 sts, then work (dc, ch 2, dc) in the next st. Repeat from * to * 5 more times (6 times in total). Sl st to join. Place a marker in each ch-2 space. (30 dc and 6 corner ch-2 spaces) What you should see: the circle is starting to look six-sided. The 6 ch-2 spaces are your corners – they are the points of the hexagon.
Round 4 Ch 3. Dc in every dc until you reach the next corner ch-2 space, then work (2 dc, ch 2, 2 dc) in that corner space. Repeat from * to * around, moving your markers up into the new corner spaces. Sl st to join.
Check your work: your piece must lie flat on the table. If the edges curl up like a bowl, your tension is too tight – try a 4.5 mm hook. If it ruffles like a frill, your tension is too loose – try a 3.5 mm hook. Do not go on until it lies flat.
Part B – The six leaf sections (Rounds 5-12):
Now the lace begins. The idea is simple and it is the same in every section: in the middle of each section you build one leaf out of dc stitches, and on both sides of the leaf you leave chain spaces. Those chain spaces become the long open slots you see in the photo. The corners are still worked the same way every round, so the hexagon keeps growing evenly. How to work a section: every round below is written as one section, then ‘repeat 6 times’. That means: work the section, move to the next corner, work the same section again, and so on, until you have worked 6 sections and are back at the start. Count your sections, not just your stitches.
Round 5 – first openwork round Ch 3. Dc in the next 2 sts, ch 3, skip the next 2 sts, dc in the next 2 sts, ch 3, skip the next 2 sts, dc in the next 2 sts, then work (2 dc, ch 2, 2 dc) in the corner space. Repeat from * to * 6 times. Sl st to join. What you should see: small holes (the ch-3 spaces) appearing in a regular pattern. Your piece is still flat – the holes are the lace starting. Rounds 6-9 – the leaves grow wider In each section, the leaf in the middle gets 1 dc wider on each side every round, and the chain spaces on its sides get longer, like this: Round 6: Ch 3. Dc in the next 3 sts, ch 3, skip 3 sts, dc in the next 3 sts, ch 3, skip 3 sts, dc in the next 3 sts, (2 dc, ch 2, 2 dc) in the corner space. Repeat 6 times. Round 7: Same as Round 6, but work dc in the next 4 sts in each leaf part instead of 3, and ch 4 instead of ch 3 for the side spaces. Round 8: Same again, with dc in the next 5 sts in each leaf part, and ch 4 side spaces.Round 9: Same again, with dc in the next 6 sts in each leaf part, and ch 5 side spaces. This is the widest point of the leaf. What you should see: six clear leaf shapes, each one widest in the middle of the round, with long open slots running along both sides of every leaf – just like the photo. If your leaf looks uneven: count the dc in one leaf. Every leaf must have the same number. Fix the odd leaf before moving on.
Rounds 10-12 – the leaves narrow to a point Now the leaves come back in again, so each one ends in a point – the star points of the photo. Round 10: Ch 3. Dc in the next 5 sts, ch 5, skip 5 sts, dc in the next 5 sts, ch 5, skip 5 sts, dc in the next 5 sts, (2 dc, ch 2, 2 dc) in the corner space. Repeat 6 times. Round 11: Same as Round 10, but with dc in the next 4 sts in each leaf part. Round 12: Same again, but with dc in the next 3 sts in each leaf part, and ch 3 spaces between the leaf parts. At the end of this round each leaf should look like a pointed leaf, narrow at the tip. Size check: measure across from one point to the opposite point. You should be at about 12-13 in (30-33 cm) now, before blocking. If you want a bigger doily, repeat Rounds 10-12 once more before the border, working one fewer dc in each leaf part each time. If you want it smaller, skip Round 12 and go straight to the border.Part C – The scalloped border (Rounds 13-14) Round 13 (mesh round): Ch 1 (does not count as a st). Sc in the next st, ch 3, skip the next 2 sts, sc in the next st, ch 3, skip the next 2 sts – work like this all the way around, and in each corner space work (sc, ch 3, sc). Sl st to join. This round makes a neat net that the edge sits on. Round 14 (scalloped edge): Sl st into the next ch-3 space. In the next ch-3 space work (sc, 3 dc, sc) – that is one scallop. In the next ch-3 space work sc only. Repeat from * to * around. At each leaf point (the corner space), work (sc, 3 dc, ch 2, 3 dc, sc) instead, to make a slightly bigger, pointed scallop at the tip. Sl st to join. Fasten off, leaving a 15 cm tail. What you should see: a wavy, scalloped edge with a gentle point at each of the 6 leaf tips. Part D – Finishing and blocking (do not skip this) 1. Weave in all ends with the tapestry needle, working the tail back through the stitches on the wrong side for about 5 cm, then trim close. 2. Wash gently: soak the doily in lukewarm water with a tiny drop of mild soap for 10 minutes. Squeeze gently – do not wring or twist it. 3. Pin it out: lay it flat on the blocking mat or a clean towel. Stretch it gently into a neat hexagon: pin each of the 6 points first, then pin the edges between them, opening up every lace slot so the pattern shows clearly. 4. Dry flat: leave it pinned until it is completely dry, ideally overnight. Only then remove the pins. Your doily will now hold its shape and the lace will look like the photo.
Care, fixing problems, and making it yours Care:
hand wash in lukewarm water, dry flat, and re-pin the points if it loses shape. Do not machine wash or tumble dry a cotton lace doily. Problem – it curls up: your tension is too tight, or you missed chain spaces. Go up a hook size and check you are not skipping the ch spaces. Problem – it ruffles: too many stitches for the round. Check your corner count (must be 6) and go down a hook size if needed. Problem – one leaf is bigger: you added or missed a stitch in that section. Count that section against a good one and fix it – lace shows uneven sections clearly after blocking. Problem – the edge waves too much: the border is too loose. Work Round 14 with a 0.5 mm smaller hook. Make it yours: for a placemat, stop after Round 12 and add the border – you will get a smaller, firmer piece. For a table centrepiece, add one extra leaf-narrowing round before the border. For a different colour, work the border round in white or cream for a two-tone finish.